Display Controls: Display Settings
Display Settings offers the ability to change the visual representation of multiple locations at a time through the use of Tags. There are two core functions that can be performed by Tags in Display Settings:
Filtering - Display only certain locations based on the Tag selected.
Visualisation - Visually distinguish between locations with different location Tags.
Important Notes about Settings
What does a Tag represent?
Each Tag represents a way of categorising a group of locations within a network, for example all locations in NSW could have the tag “STATE: NSW”. These Tags can then be used for filtering relevant locations when performing various processes within the explorer. Locations can also have multiple tags assigned to them, for example a location in Melbourne can have the tags “CITY: Melbourne” and “STATE: VIC”.
How are they used in Display Settings?
In Display Settings users can order Tags from top to bottom in a level of importance. The higher a Tag is, the higher its priority will be in displaying over Tags below it. These tags can be rearranged depending on the aims of the analysis.
Tip in making useful Tags
Include within the Tag the category of what it represents. For example, for all State Tags used in a Network their category would be “STATE”, so for a State such as “VIC” its Tag would combine into “STATE: VIC”.
Filtering Locations
In filtering for locations there may be different requirements of what the user is trying to achieve:
Display only certain types of locations
Don’t display a particular type of location
This can be achieved by following the below.
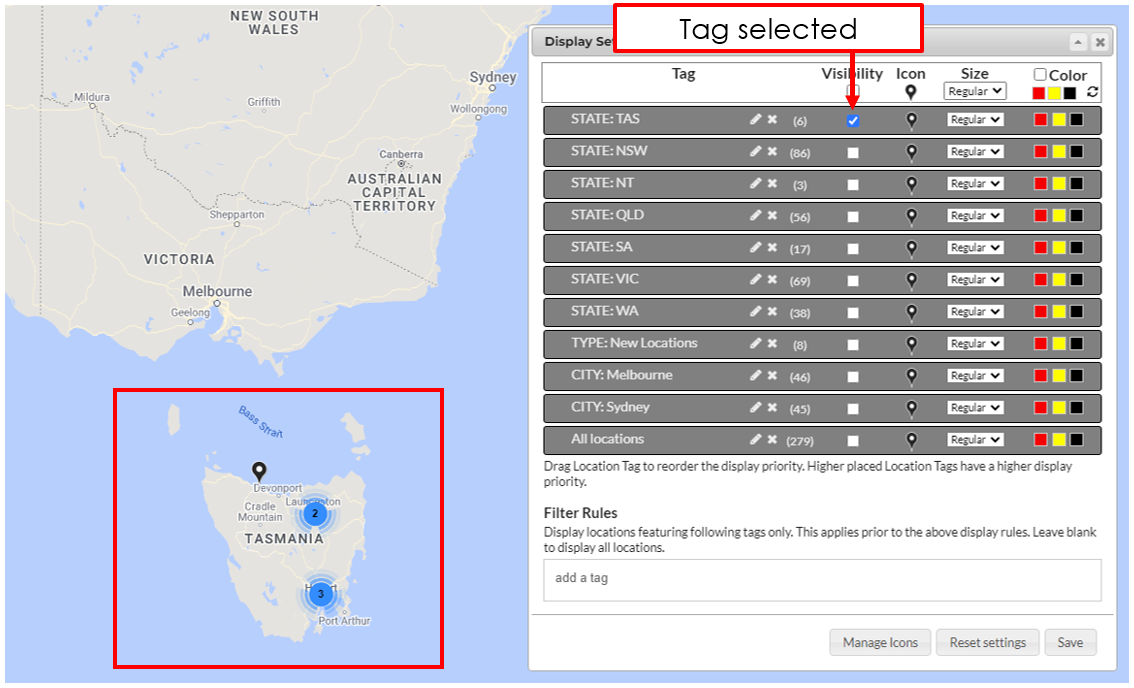
Only locations within Tasmania are displayed
Display only certain types of locations:
Drag the Tag to the top of the Display Settings or double click the little arrow next to the Tag name.
Check off the box underneath “Visibility” in the top menu in Display Settings.
Check on the Tag that has been dragged to the top.
Hit “Save” in the bottom right.
Users can also view particular locations by typing the Tag into “Filter Rules”. Ensure when doing this the box below “Visibility” is checked on.
MULTIPLE TAGS: This can also be done with multiple tags, for example users can display only NSW and QLD sites by dragging both tags to the top of Display Settings and checking their visibility on.
All locations except for those in Tasmania are displayed
Don’t display a particular type of location:
Find the Tag which represents locations to be excluded and drag it to the top of display settings or double click the little arrow next to the Tag name.
Check on the box underneath “Visibility” in the top menu in Display Settings.
Check off the Tag that has been dragged to the top.
Hit “Save” in the bottom right.
MULTIPLE TAGS: This can also be done with multiple Tags, for example users can display only NSW and QLD sites by dragging both Tags to the top of Display Settings and checking their visibility on.
Advanced Filter Options:
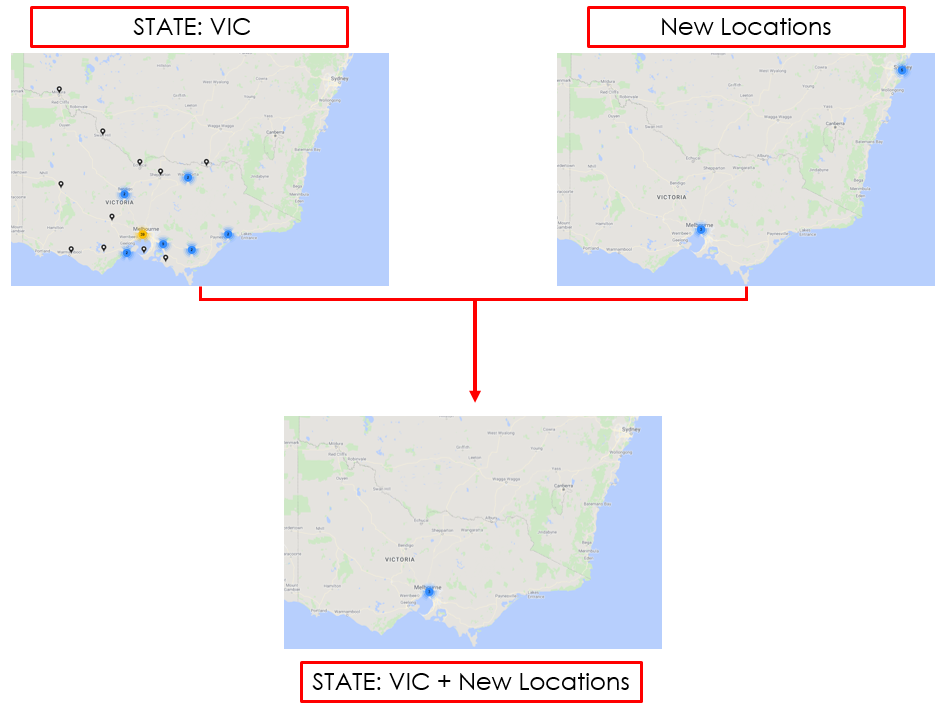
New locations that only exist in Victoria
For the Tag Visibility Table and Filter Rules, Tags within their respective sections have OR conjunctions between themselves. This means a location only needs to contain one of the Tags selected to be included.
Between the Tag Visibility Table and the Filter Rules however, checking on a single Tag in the Tag Visibility Table and entering a Tag within Filter Rules acts as an AND conjunction. This means that locations must have both Tags selected in the Tag Visibility Table AND the Filter Rules to be included.
Add first Tag into Filter Rules (Tag order is interchangeable), submit Tag by entering “,”
Drag second Tag to the top of Display Settings or click the little arrow next to the Tag name.
Check off the box underneath “Visibility” in the top menu in Display Settings.
Check on the Tag that has been dragged to the top.
Hit “Save” in the bottom right.
MULTIPLE TAGS: This can also be done with multiple Tags, for example users can display only “STATE: NSW” and “STATE: QLD” sites with “TYPE: New Locations” by dragging both Tags to the top of Display Settings and checking their visibility on.
Customisation


On top of filtering select locations users can also choose between different Icons, Sizes and Trade Area colours to help distinguish between different types of locations.
Available options include:
Rename: Click on the pencil icon - changes a Tags name. After changing, click on the small tick that will be displayed next to it.
Delete: Click on the small x, this will remove the Tag from the network. It will not delete the locations.
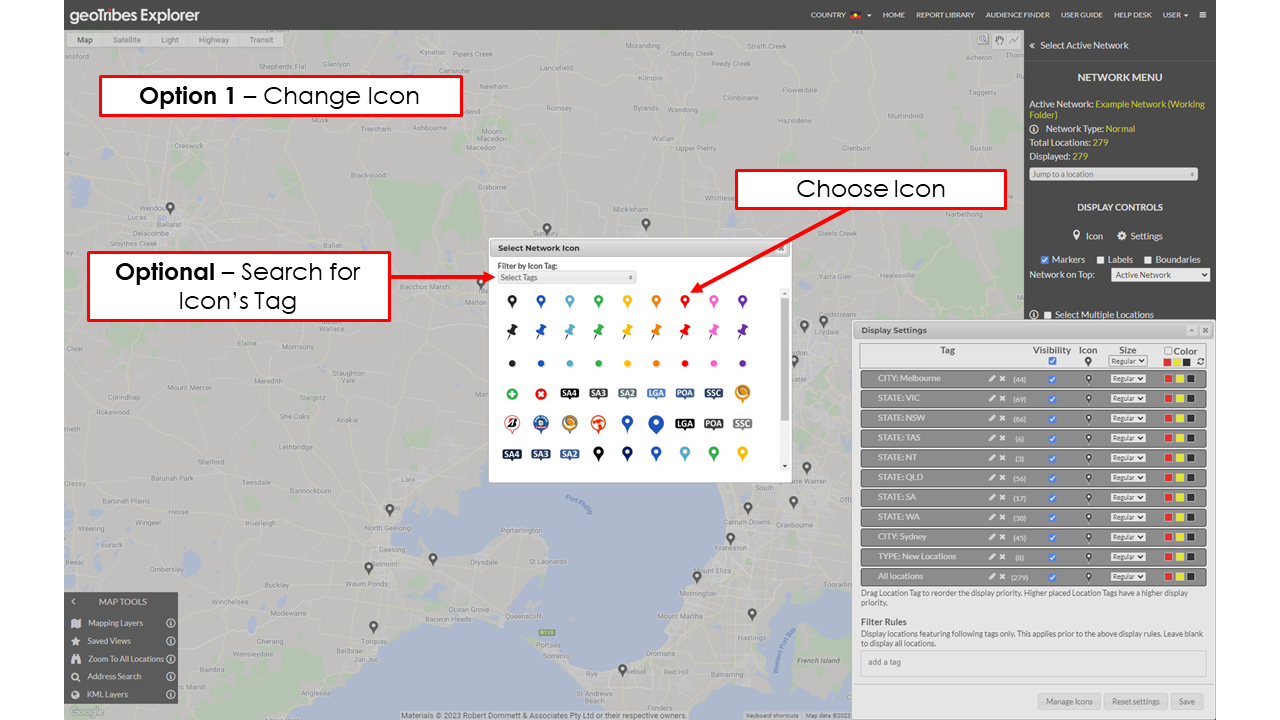
Icons: Customise the Tags individual Icon. If users wish to upload their own Icon for a Tag click on “Manage Icons” read more here.
Size: Help a site stand out by adjusting its size.
Colour: Update the primary, secondary and tertiary colours for a Tag, this enables all locations with the given Tag to have a different colour scheme than the rest of the network. To do this, check on first the “Color” box in the top right. To undo all click the refresh option next to the color button. If preferable to modify all Trade Area colours read more here
IMPORTANT - Select “Save” to implement changes.
Reset settings - Resets ordering of Tags (alphanumeric ordering), Icon and the Icon size, Trade Area colours and Filtering Rules Inputs.


